

USB-SD-Mux: Automated SD-Card Juggler
Once the bootloader on your embedded device is up and running the development of kernel and userland in PTXdist-based BSPs is usually based on booting from network. Thus there is no need for the developer to write the boot media with a new image.
But if you want to introduce automated testing of whole BSPs on a target you need a way to re-write the boot media with the latest image from continuous integration.
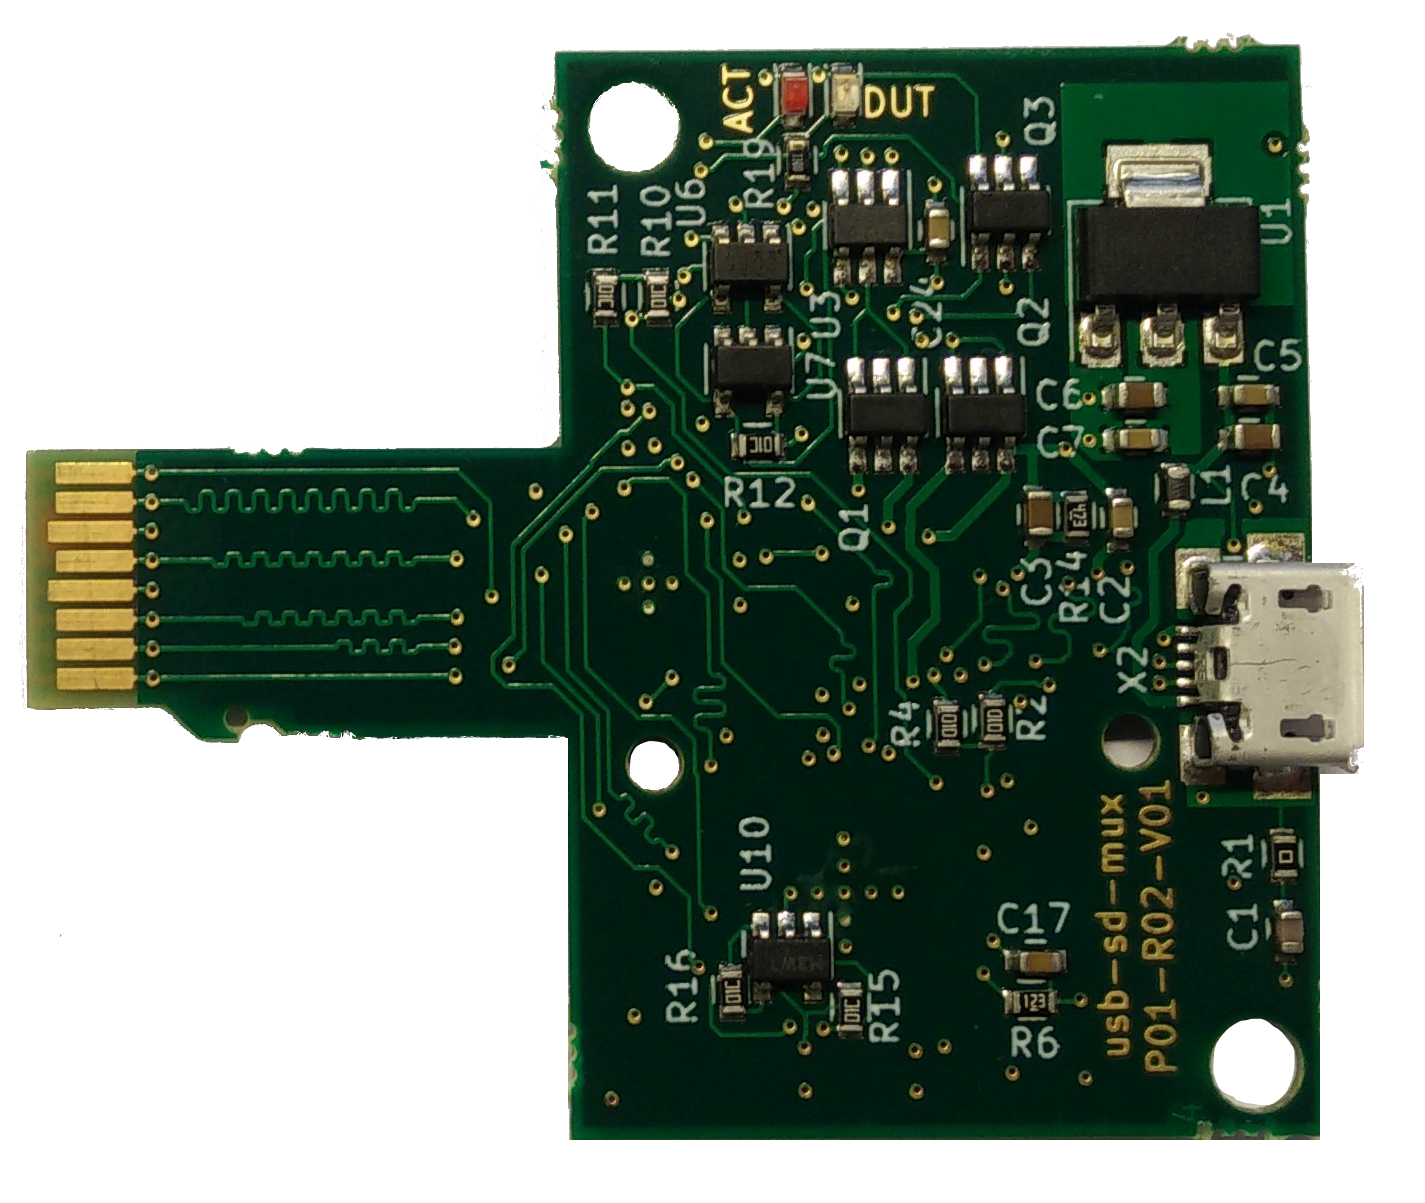
USB-SD-Mux: Front
Introducing the USB-SD-Mux
For systems with SD- or Micro-SD-Card slot an USB-SD-Mux can help you with this job. The USB-SD-Mux has the following interfaces:
- Micro-SD-Card slot: This slot contains the media you want to use with your target. You can use your off the shelf Micro-SD-Card here or use your top-notch low-voltage high-speed card - what ever fits your target.
- Micro-SD-Card shape: This part of the PCB mimics the shape of a Micro-SD-Card and can be inserted into Micro-SD-slots on most targets.
- USB-Interface: The USB-Connection is used to power the device and to expose the USB-SD-Mux to your automation server. This interface is used to control the USB-SD-Mux and to access the Micro-SD-Card via the integrated card reader.

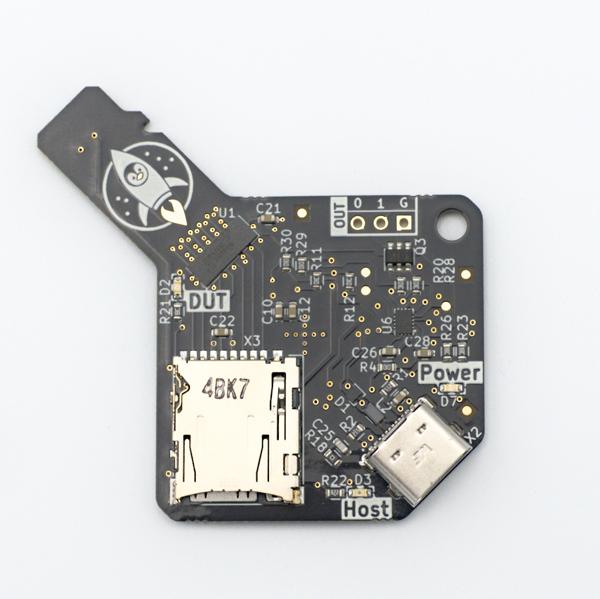
USB-SD-Mux: Back
The key feature of the USB-SD-Mux is the ability to switch the Micro-SD-Card between the target and the test server. This makes it possible to use sequences like the following:
- Switch the Micro-SD-Card to the integrated card reader and thus make it accessible to your test server.
- Write your image to the Micro-SD-Card.
- Switch the Micro-SD-Card over to the target.
- Power up your target and boot from Micro-SD-Card.
Using the USB-SD-Mux
Once connected to your test server the USB-SD-Mux will be detected as an off the shelf card reader:
cfi@klee:~$ dmesg -w
[ 4097.117229] usb 1-4: new high-speed USB device number 9 using xhci_hcd
[ 4097.257372] usb 1-4: New USB device found, idVendor=0424, idProduct=2640
[ 4097.257381] usb 1-4: New USB device strings: Mfr=0, Product=0, SerialNumber=0
[ 4097.258324] hub 1-4:1.0: USB hub found
[ 4097.258354] hub 1-4:1.0: 1 port detected
[ 4097.545236] usb 1-4.1: new high-speed USB device number 10 using xhci_hcd
[ 4097.701956] usb 1-4.1: New USB device found, idVendor=0424, idProduct=4041
[ 4097.701970] usb 1-4.1: New USB device strings: Mfr=1, Product=2, SerialNumber=3
[ 4097.701974] usb 1-4.1: Product: usb-sd-mux_rev2.0
[ 4097.701978] usb 1-4.1: Manufacturer: Pengutronix
[ 4097.701981] usb 1-4.1: SerialNumber: 000000000101
[ 4097.720825] usb-storage 1-4.1:1.0: USB Mass Storage device detected
[ 4097.720864] scsi host6: usb-storage 1-4.1:1.0
[ 4097.720970] usbcore: registered new interface driver usb-storage
[ 4097.721880] usbcore: registered new interface driver uas
[ 4098.742245] scsi 6:0:0:0: Direct-Access     PTX      sdmux HS-SD/MMC  2.09 PQ: 0 ANSI: 0
[ 4098.742963] sd 6:0:0:0: Attached scsi generic sg1 type 0
[ 4098.744841] sd 6:0:0:0: [sdb] Attached SCSI removable disk
Every USB-SD-Mux is identified by a unique SerialNumber at USB-level. This makes it possible to use several USB-SD-Mux on a test server and keep them apart:
cfi@klee:~$ ls /dev/usb-sd-mux/
id-000000000101
On a high-level perspective the USB-SD-Mux is controlled via a piece of Python software. This software is available at GitHub. Using this software you can simply switch the destination of your Micro-SD-Card:
cfi@klee:~$ usbsdmux --help
usage: usbsdmux [-h] sg {dut,host,off,client}

positional arguments:
  sg                    /dev/sg* to use
  {dut,host,off,client}
                        mode to switch to. Can be {off, DUT, host}

optional arguments:
  -h, --help            show this help message and exit
For example using DistroKit to build a BSP for a BeagleBoneBlack and deploying it using the USB-SD-Mux can look like:
cfi@klee:~/DistroKit$ ptxdist images
cfi@klee:~/DistroKit$ sudo usbsdmux /dev/usb-sd-mux/id-000000000101 host
cfi@klee:~/DistroKit$ dd if=platform-v7a/images/beaglebone.hdimg of=/dev/sdb bs=4M
cfi@klee:~/DistroKit$ sudo usbsdmux /dev/usb-sd-mux/id-000000000101 dut
cfi@klee:~/DistroKit$ # Powercycle your target
Low-Level Features
Target Voltage
The USB-SD-Mux uses a high speed analog switch to connect the Micro-SD-Card to either of the targets. Such devices are designed to operate just inside their supply voltage range.
The USB-SD-Mux is internally powered with 3.3V. This limits the usable voltage range of the target SD-Card-supply to 0 .. 3.5V. On the bright side: The SD-Card interface is only specified up to 3.3V so this should fit most needs. And you are able to use low-voltage Micro-SD-Cards with - for example - 1.8V.
Break-Before-Make Switching
The control software uses, what the hardware guys would call, break-before-make switching. This means that the Micro-SD-Card is disconnected from the previous endpoint before connecting it to the next endpoint. The sequence is timed in a way that powers off the Micro-SD-Card before re-connecting it. A complete power-off makes sure the Micro-SD-Card is reset properly.
Customize USB-Representation
The Product-, Manufacturer- and Serialnumber-Strings reported via USB can be customized to your needs:
cfi@klee:~$ usbsdmux-configure --help
usage: usbsdmux-configure [-h] [--productString PRODUCTSTRING]
                          [--manufacturerString MANUFACTURERSTRING]
                          [--VID VID] [--ScsiManufacturer SCSIMANUFACTURER]
                          [--ScsiProduct SCSIPRODUCT] [--PID PID]
                          sg serial

This tool writes and verifies the configuration EEPROM of the usb-sd-mux with
the information given on the command line.

positional arguments:
  sg                    The /dev/sg* to use
  serial                Serial-Number to write. Should be unique.

optional arguments:
  -h, --help            show this help message and exit
  --productString PRODUCTSTRING
                        Product-Name to write.
  --manufacturerString MANUFACTURERSTRING
                        Manufacturer-Name to write.
  --VID VID             USB Vendor ID
  --ScsiManufacturer SCSIMANUFACTURER
                        Value for the SCSI Manufacturer to write
  --ScsiProduct SCSIPRODUCT
                        Value für the SCSI Product Name to write
  --PID PID             USB Product ID
Weiterführende Links

Secure Boot on Rockchip RK3588
The Rockchip RK3588 SoC provides hardware features to verify the integrity and legitimacy of firmware running on a device. I presented how to enable Rockchip Secure boot with barebox at the Embedded Recipes conference 2026 in Nice. This blog post goes into more details on how Secure Boot works on the RK3588, how to enable Secure Boot in barebox, and what to take into consideration when integrating it into devices.

Pengutronix bei der Embedded Testing 2026
Pengutronix ist in diesem Jahr wieder Partner der der Embedded Testingu nd ist dort sowohl mit einem Stand als auch mit einem Vortrag vertreten. Die Embedded Testing findet am 24. und 25. Februar 2026 in Unterhaching bei München statt.
RAUC und labgrid Sponsoring-Pakete ab jetzt im Shop!
RAUC und labgrid sind Open Source Software-Projekte, die beide bei Pengutronix gestartet wurden und in ihren jeweiligen Nischen mittlerweile recht erfolgreich geworden sind. Ab heute ist es möglich Sponsoring-Pakete im Linux Automation GmbH Shop zu erwerben, die die Entwicklung dieser Projekte unterstützen.
Talks, Workshops und Zeit am Strand - Die Embedded Recipes 2025
Ich war dieses Jahr Teil einer kleinen Delegation Pengutronixianer, die an der Embedded-Recipes-Konferenz in Nizza, Frankreich teilgenommen haben. Wir hatten eine tolle Zeit in Nizza und wollen jetzt die Gelegenheit nutzen nochmal einen Blick zurück auf unsere Lieblingstalks und unseren labgrid-Workshop zu werfen.

Labgrid Hands-On Training at Embedded Recipes 2025
We are happy to announce that we are hosting a one-day version of our hands-on labgrid training at the Embedded Recipes in Nice, France. The workshop takes place on day three of the Embedded Recipes (16.05.2025) and is part of the workshop track. The workshop is free of charge, but registration is required.

Pengutronix bei der Embedded Testing 2025
Unser Spin-Off Linux Automation ist in diesem Jahr Aussteller auf der Embedded Testing und ist dort sowohl mit einem Stand als auch mit einem Vortrag dabei. Für Pengutronix als Dienstleister für Embedded-Geräte in verschiedenen Industriebereichen ist Testing selbstverständlich. Dies kann in der Form von Tests in den jeweiligen Upstream-Projekten oder in der Form von Integrationstests eines vollständigen Embedded-Linux-Systems auf der Kunden-Hardware geschehen.
labgrid geht auf Live-Tour!
labgrid erlaubt es uns, Embedded-Linux-Geräte aus der Ferne zu steuern und Integrationstests von Embedded-Linux auf echter Hardware zu implementieren. Pengutronix und andere Firmen setzen daher schon einige Zeit erfolgreich auf labgrid als Mittelpunkt ihrer Embedded-Software-Entwicklungsinfrastruktur.
Der USB-SD-Mux ist nun FAST
Seit 2019 vertreiben wir mit unserer Partner-Firma Linux Automation GmbH den USB-SD-Mux. Damit konnten wir vielen Embedded Entwickler*innen die Arbeit erleichtern und dadurch die Softwarequalität verbessern. Zugleich schreitet die Technik voran: Micro-SD-Karten werden schneller und mittlerweile hat sich USB-C als Standard etabliert.

USB-SD-Mux now reads SD Card registers
The USB-SD-Mux is designed to make life easier for embedded software engineers by automating the transfer of an SD card between a host PC (deploying a new software image to the SD card) and an embedded Linux device. Since we have introduced this device into our Embedded Linux development workflow back in 2019 we have probably written thousands of SD card images with it. Now the usbsdmux software controlling the device has gained a new feature: It can now read and decode a few SD card information registers. This makes it possible to gain more insight into the capabilities of the used SD card - especially while developing on low-level software and drivers interfacing with the SD card.
LXA USB-T1L ❤️ Beagle Play: Exploring Single Wire Ethernet
It seems everybody is talking about Single Pair Ethernet (SPE) these days. So we want to follow the trend and do the same :-) SPE is a class of Ethernet transmission standards that uses just a single pair of twisted pair cable for data transmission. There are multiple SPE variants spanning maximum data rates from a hand full MBit/s to multiple GBit/s and cable lengths from a hand full of meters to kilometers. The most interesting ones from our embedded-centric point of view are 10Base-T1L (point-to-point, up to 1 km), 10Base-T1S (multidrop, approx. 10 m) and 100Base-T1 (point-to-point, 15 m). The new Beagle Play comes with a 10Base-T1L PHY. This makes it a great peer to experiment with our Linux Automation USB-T1L. In this post we will explore the possibilities of 10Base-T1L on a recent Linux system.